【AWS】Cloud9上でITテスト
1. 使用するサービス
(AWS)
- Cloud9
2. 使用する言語
3.概要
まず、ここで言う結合テストの目的としては、Cloud9上の関数をAWSのサービス、Lambdaとしてデプロイした後の疎通確認として位置付けます。テストの内容も単体テストと同じです。違いとしては仮想的なLambdaか実際にデプロイしたLambdaに対してテストをするかになります。
実装面に関しては違いのある箇所のみ記載します。
後は前回参照です。
buffalokusojima.hatenablog.com
4. 実装
import unittest
import json
import csv
import logging
import os

import boto3
lambda_client = boto3.client('lambda')

logger = logging.getLogger()
logger.setLevel(logging.INFO)

def readTestData(csvFile):

    test_list = []

    with open(csvFile, encoding="UTF-8") as f:
        for line in csv.DictReader(f):
            del line["備考"]
            test_list.append(line)

    return test_line

class TestHandlerClass(unittest.TestCase):

    def test_response(self):
        logger.info("Hello Lambda Test")
        test_file_path = "../Data/hello.csv"
        test_file_path = os.path.join(os.path.dirname(__file__), test_file_path)
        test_list = readTestData(test_file_path)
        logger.info(test_list)
        for test in test_list:
            result = lambda_client.invoke(FunctionName=Project+"-"+Stage+"-HelloWorldFunction")
            self.assertEqual(result['statusCode'], 200)
            result = result['Payload'].read()
            result = json.loads(result)
            self.assertEqual(result['statusCode'], 200)
            self.assertEqual(json.loads(result['body']), test)
            self.assertEqual(result['headers'], {"Content-type": "application/json"})

if __name__ == '__mian__':
    unittest.main()
5. おわりに
これでデプロイ後のLambdaに対してテストが自動で行えます。
主に、単体テストでロジックの確認で、結合テストではRoleやタイムアウト時間などの確認になります。
【AWS】Cloud9上でUnitテスト
1. 使用するサービス
(AWS)
- Cloud9
2. 使用する言語
3.概要
Cloud9上でPythonのモジュール、unittestを用いたUnitテストに関して記載します。主にテストの対象はLambdaでテストの内容は基本的に与えられたテストデータとそれに対して期待通りのリターンをするかのブラックボックステストになります。
4. 実装
4-1. フォルダ構成
下記のようにhello Lambdaとそれをテストするtest_hello.py、及びテストデータとなるhello.csvを用意します。
demo----hello
| |
| |--index.py
|
|--tests
|
|--Data
| |
| |--hello.csv
|
|--Unit
|
|-test_hello.py
4-2. テスト対象のLambda
下記のようにコードを用意しておきます。
import json

def handler(event, context):

    data = {
         "data": "Hello World"
     }
     print("hello world")

     return {
          "statusCode": 200,
          "body": json.dump(data),
          "headers": {"Content-type": "application/json"}
     }
4-3. テストスクリプト
か機能ようにtest_hello.pyのコードを用意しておきます。テストスクリプトのファイル名の最初には必ずtestをつけてください。
import unittest
import json
import csv
import logging
import os
from hello import index

logger = logging.getLogger()
logger.setLevel(logging.INFO)

def readTestData(csvFile):

    test_list = []

    with open(csvFile, encoding="UTF-8") as f:
        for line in csv.DictReader(f):
            del line["備考"]
            test_list.append(line)

    return test_line

class TestHandlerClass(unittest.TestCase):

    def test_response(self):
        logger.info("Hello Lambda Test")
        test_file_path = "../Data/hello.csv"
        test_file_path = os.path.join(os.path.dirname(__file__), test_file_path)
        test_list = readTestData(test_file_path)
        logger.info(test_list)
        for test in test_list:
            result = index.handler(None, None)
            self.assertEqual(result['statusCode'], 200)
            self.assertEqual(json.loads(result['body']), test)
            self.assertEqual(result['headers'], {"Content-type": "application/json"})

if __name__ == '__mian__':
    unittest.main()
4-4. テストデータ
下記のようにテストデータとその説明を備考として書いてあります。プログラム内でJSONに変換し、備考の部分は削除します。あくまでレビュー時に見やすくする為に存在します。
"data","備考"
"Hello World", "正常値テスト"
5. 実行
demoフォルダの上のフォルダから実行します。
5-1. 環境変数の更新
下記コマンドでPythonの実行環境を変更します。
export PYTHONPATH=/home/ec2-user/environment/demo
5-2. 下記コマンドでテストを指定して実行します。
python -m unittest demo.tests.Unit.test_hello
5-3 下記コマンドでフォルダ内のtestと名のつくファイルを実行します。
python -m unittest discover demo.tests.Unit
6. おわりに
これで、テストデータを増やすことでテストを自動的に複数実行されるようになります。テストデータもcsvで比較的見やすく、lambdaのコードと一緒にレビューすることで漏れも少なくなるかと思います。また、レビューしてもらう前にはしっかりと事前に実行してテストが完了してから改めてレビューしてもらいましょう。
【AWS】CodepipelineのSlack通知
1. 使用するサービス
(AWS)
- Codepipeline
(外部サービス)
- Slack
2. 概要
開発でCodepieplineを使用していますが、githubからのプルリクの通知はSlackに対して行ってましたが、そういえばCodepipelineからの通知をやって無いなってことで備忘録として残しておきます。
3. 実装
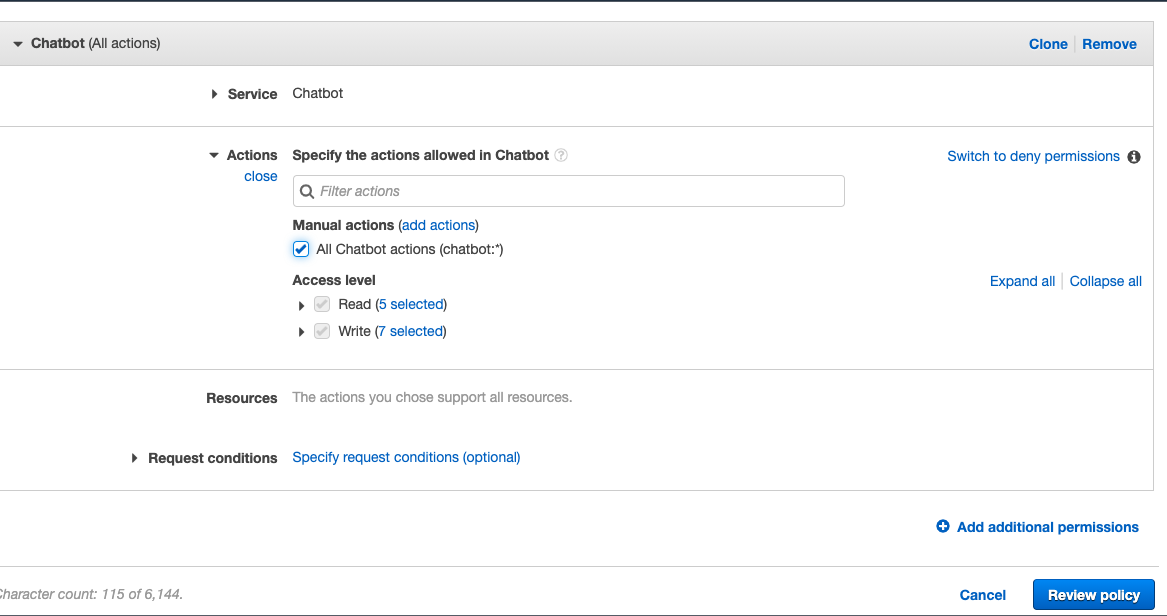
3-1. IAMポリシー作成
下記のようにchatbot用のポリシーを作成し、自身のIAMユーザにアタッチします。
3-2. chatbotを開く
ポリシーがアタッチされたユーザでchatbotをコンソール上で開き、slackを選択します。
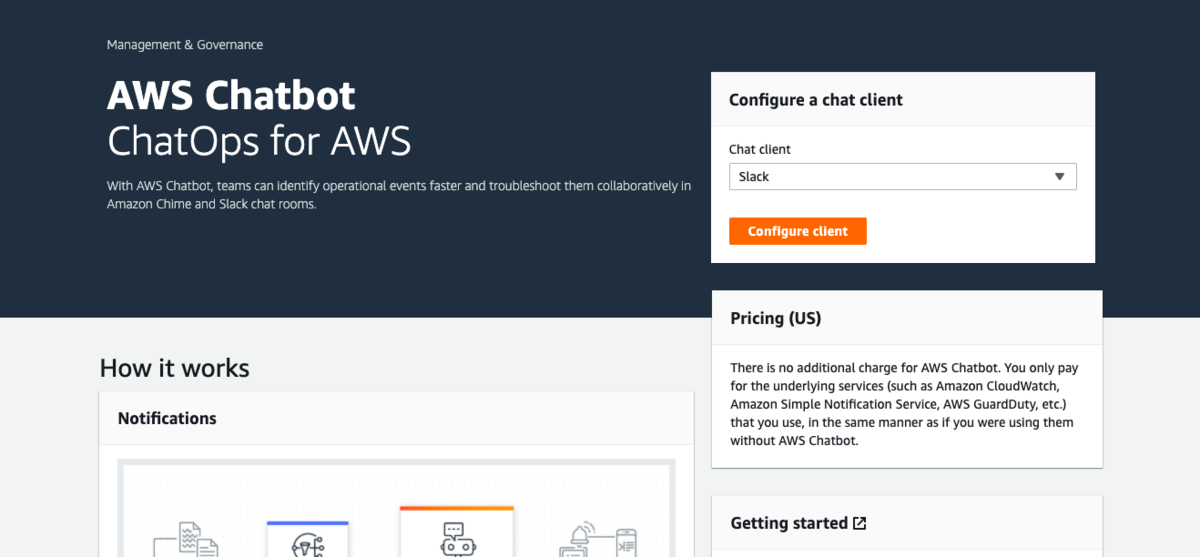
すると、Slackでログインをしていると、連携許可画面になるので許可します。
後は、通知先のチャンネルを設定して終わりです。
3-3. Codepipelineとの連携
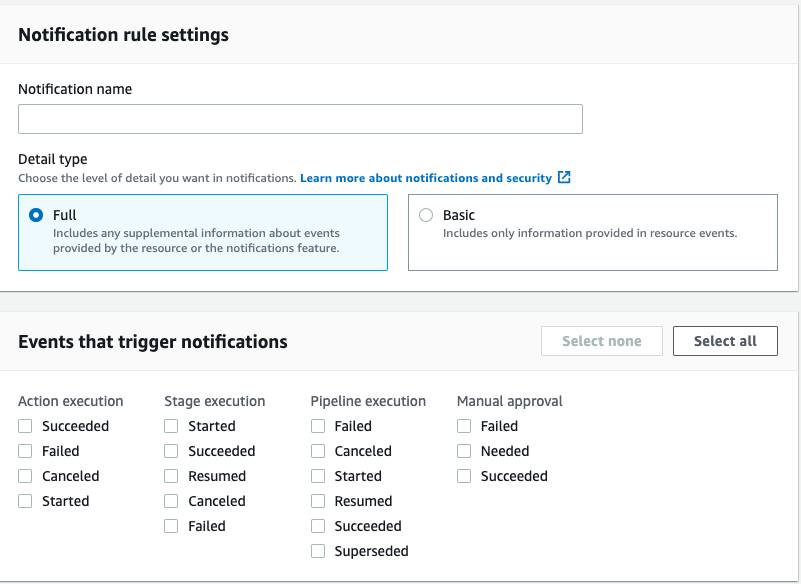
Codepipelineの通知設定をしたいパイプラインからCreate Notificationを選択し、通知設定を作成します。
Events that trigger notificationsで通知したい状態を選択します。基本はSuccessとFaildでいいかと思います。
4. 終わり
以上で、簡単にCodepipelineのSlack通知が完了します。やってみるとわかりますが、連続でプッシュとかすると鬼のようにうるさいです。開発メンバーのプッシュ頻度とか、通知するチャンネルを考慮して実装して見てください。
【AWS】CloudformationでCognito作成
1. 使用するサービス
(AWS)
- Cloudformation
- Cognito
2.概要
Cloudformationを使用してログイン後にトークンを渡し、以降のLambdaとのやり取りをトークンの認証を用いて実装するようなCognitoを作成します。
大体デフォルト設定ですが、注意点コメント入れておきます。
  UserPool:
    Type: "AWS::Cognito::UserPool"
    Properties:
      UserPoolName: !Sub "${Project}-${Stage}-UserPool"
      AdminCreateUserConfig:
          AllowAdminCreateUserOnly: false
          UnusedAccountValidityDays: 7
      AliasAttributes:
        - email
      AutoVerifiedAttributes:
        - email
      UsernameConfiguration:
        CaseSensitive: True
      EmailVerificationMessage: "Your verification code is {####}."
      EmailVerificationSubject: "Your verification code"
      #ログイン後に処理をしたい場合はここにLambda追加
      LambdaConfig:
        PostConfirmation: !GetAtt PostConfirmationFunction.Arn
      MfaConfiguration: 'OFF'
      Policies:
        PasswordPolicy:
          MinimumLength: 8
          RequireLowercase: true
          RequireNumbers: true
          RequireSymbols: true
          RequireUppercase: true
      Schema:
        - AttributeDataType: "String"
          DeveloperOnlyAttribute: false
          Mutable: true
          Name: "email"
          StringAttributeConstraints:
            MaxLength: "2048"
            MinLength: "0"
          Required: true
      SmsAuthenticationMessage:  "Your authentication code is {####}."
      SmsVerificationMessage: "Your verification code is {####}."


  UserPoolClient:
    Type: AWS::Cognito::UserPoolClient
    Properties:
      ClientName: !Sub "${Project}-${Stage}-UserPollClient"

      #トークン承認の場合は、基本的にimplicitとopenidで大丈夫なはず
   AllowedOAuthFlows:
        - implicit
      AllowedOAuthScopes:
        - openid
      AllowedOAuthFlowsUserPoolClient: true
      GenerateSecret: false
   #ここをCOGNITOにしないとログイン画面でエラーになる
   #必要に応じてFacebookなどプロバイダー追加
      SupportedIdentityProviders:
        - COGNITO
      #ログイン後の画面URLを記載
      CallbackURLs:
       - !Sub "https://${S3DomainName}-${Project}-${Stage}.${HostedZoneName}/index.html"
      #ログアウト後の画面URLを記載
      LogoutURLs:
       - !Sub "https://${S3DomainName}-${Project}-${Stage}.${HostedZoneName}/index.html"
      UserPoolId:
        Ref: UserPool

  # Not use custom domain because of this https://github.com/aws-cloudformation/aws-cloudformation-coverage-roadmap/issues/241
  UserPoolClientDomain:
    Type: AWS::Cognito::UserPoolDomain
    Properties:
      Domain: !Sub "${SinginDomain}-${Project}-${Stage}"
      UserPoolId: !Ref UserPool
ログイン画面のドメインはデフォルトの使用します。CLoudformationで一気に独自ドメインまで作成するのは現時点では簡単に実装できません。恐らく、ドメインの紐付けか何かに時間がかかる為?
GUIだと確かに時間はかかるけど簡単にできます。
【AWS】CloudformationでAPI GatewayをHttps化
1. 使用するサービス
(AWS)
- Cloudformation
- Cloudfront
- Route53
2. 概要
CLoudformationでAPI GateawyのHttps化を行います。正確には作成済のAPI Gawewayに対してドメインを作成し、HTTPSで配信可能にします。その際、デプロイするAPIとそのステージをマッピングします。
3. 実装
Parameters:

  Project:
    Description: "Project Name"
    Default: "demo"
    Type: String

  Stage:
    Description: "Environment stage"
    Default: dev
    Type: String
    AllowedValues: [dev, staging, prod]

  APIDomainName:
    Description: "DomainName, format of which is api-Project-Stage"
    Default: api
    Type: String

  WebContentsBucketBaseName:
    Description: "WebContents S3 Bucket Name, fomat of which is Project-Stage"
    Default: webcontents
    Type: String

  HostedZoneName:
    Description: "DomainName"
    Default: example.com
    Type: String


Resources:

#API Gatewayのドメインを作成します。
#事前に作成済のドメインに合うようなドメインにします。
  ApiGatewayDomainName:
    Type: 'AWS::ApiGateway::DomainName'
    Properties:
      #証明書のArn
      CertificateArn: !Sub "arn:aws:acm:us-east-1:${AWS::AccountId}:certificate/111111111111111111"
      DomainName: !Sub "${Project}-${Stage}-${APIDomainName}.${HostedZoneName}"

   #API Gatewayのマッピング
  ApiGatewayDomainMapping:
    Type: 'AWS::ApiGateway::BasePathMapping'
    Properties:
      DomainName: !Ref ApiGatewayDomainName
      Stage: !Ref Stage
      RestApiId: !Ref RestApi

  #ドメインレコードを登録して、名前解決出来るようにする
  Route53RecordSetForAPI:
    Type: 'AWS::Route53::RecordSetGroup'
    Properties:
      HostedZoneName: !Sub "${HostedZoneName}."
      RecordSets:
        - Name: !Sub "${Project}-${Stage}-${APIDomainName}.${HostedZoneName}."
          Type: A
          AliasTarget:
            HostedZoneId: Z2FDTNDATAQYW2
            DNSName: !GetAtt ApiGatewayDomainName.DistributionDomainName
【AWS】CloudformationでRDSと
1. 使用するサービス
(AWS)
- Cloudformation
- Lambda
- Subnet
- Security Group
- RDS
- RDS Proxy
2.概要
仕事でCloudformationを触る機会が増えたので備忘録として残します。最近グローバルリリースされたRDS Proxyを検索しても中々これといったCloudformationで作成した記事が無いので色々、調べた結果作成されたテンプレートを載せます。
3. 実装
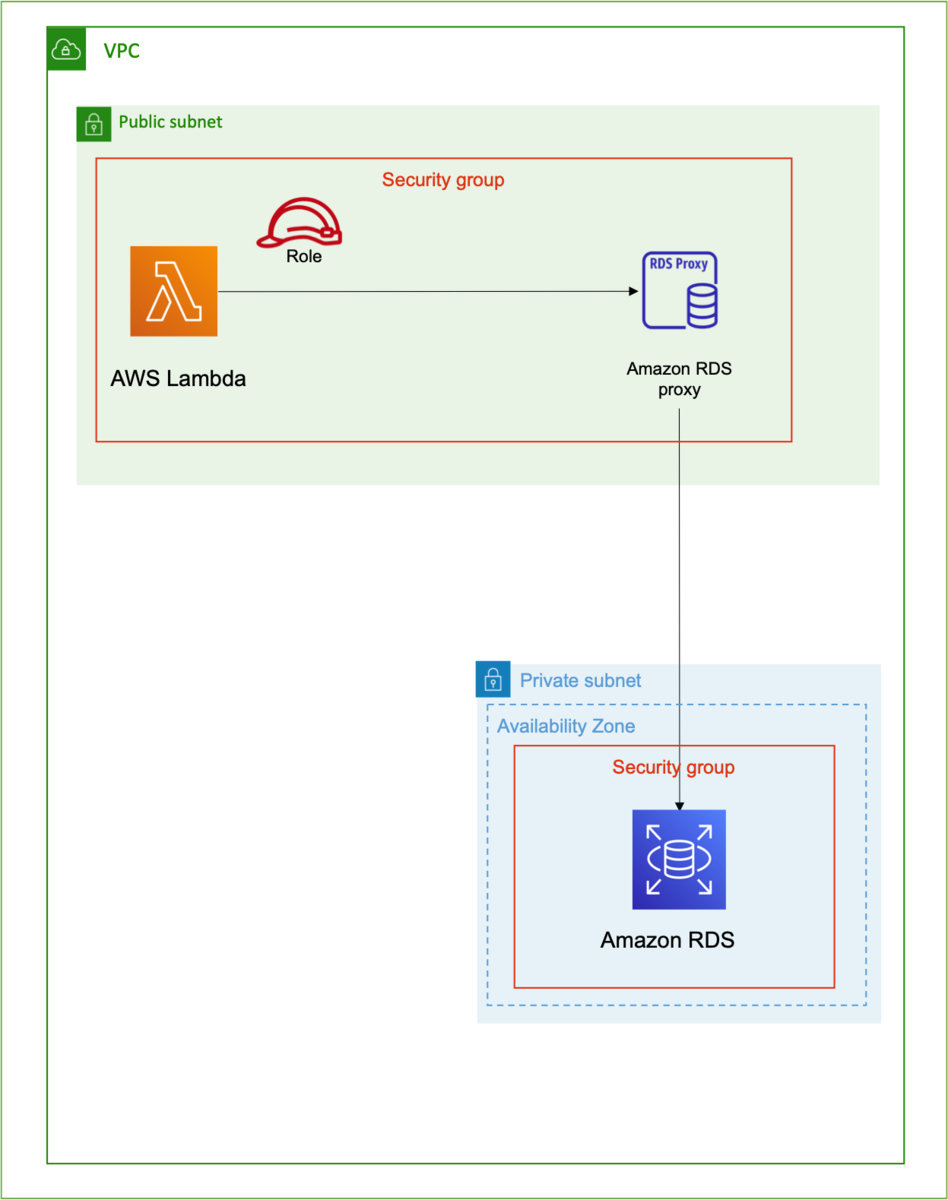
3-1. 実装イメージ
各種セキュリティグループでアクセス制御します。RDSのパスワード等はSystem Managerに保管します。
3-2. テンプレート
AWSTemplateFormatVersion: '2010-09-09'
Transform: AWS::Serverless-2016-10-31
Description: Outputs the time

Parameters:

  DBName:
    Description: "DB Name"
    Default: test
    Type: String

Resources:

  TestFunction:
    Type: AWS::Serverless::Function
    Properties:
      Handler: index.handler
      Runtime: python3.8
      CodeUri: ./test
      Role: !GetAtt TestRole.Arn
      VpcConfig:
        SecurityGroupIds:
          - !Ref TestLambdaSecurityGroup
        SubnetIds:
          - !Ref TestPubSubnet1a
          - !Ref TestPubSubnet1c
      Environment:
        Variables:
          RDSEndpoint: !GetAtt RDSProxyTest.Endpoint
          MasterUsername: !Sub '{{resolve:secretsmanager:${RDSTestInstanceRotationSecret}:SecretString:username}}'
          MasterUserPassword: !Sub '{{resolve:secretsmanager:${RDSTestInstanceRotationSecret}:SecretString:password}}'
          DBName: !Ref DBName

  TestRole:
    Type: AWS::IAM::Role
    Properties:
      RoleName: "TestRole"
      AssumeRolePolicyDocument:
        Version: "2012-10-17"
        Statement:
          -
            Effect: "Allow"
            Principal:
              Service:
                - "lambda.amazonaws.com"
            Action:
              - "sts:AssumeRole"
      ManagedPolicyArns:
        - arn:aws:iam::aws:policy/service-role/AWSLambdaBasicExecutionRole
        - arn:aws:iam::aws:policy/AmazonRDSFullAccess
        - arn:aws:iam::aws:policy/AmazonEC2FullAccess

      MaxSessionDuration: 3600
      Path: "/"

  TestVPC:
    Type: AWS::EC2::VPC
    Properties:
      CidrBlock: 10.0.0.0/16
      Tags:
      - Key: "Name"
        Value: "TestVpc"

  TestPubSubnet1a:
    Type: AWS::EC2::Subnet
    Properties:
      VpcId:
        Ref: TestVPC
      CidrBlock: 10.0.1.0/24
      AvailabilityZone: "ap-northeast-1a"
      Tags:
      - Key: "Name"
        Value: "TestPubSubnet1a"

  TestPubSubnet1c:
    Type: AWS::EC2::Subnet
    Properties:
      VpcId:
        Ref: TestVPC
      CidrBlock: 10.0.2.0/24
      AvailabilityZone: "ap-northeast-1c"
      Tags:
      - Key: "Name"
        Value: "TestPubSubnet1c"

  TestPriSubnet1a:
    Type: AWS::EC2::Subnet
    Properties:
      VpcId:
        Ref: TestVPC
      CidrBlock: 10.0.3.0/24
      AvailabilityZone: "ap-northeast-1a"
      Tags:
      - Key: "Name"
        Value: "TestPriSubnet1a"

  TestPriSubnet1c:
    Type: AWS::EC2::Subnet
    Properties:
      VpcId:
        Ref: TestVPC
      CidrBlock: 10.0.4.0/24
      AvailabilityZone: "ap-northeast-1c"
      Tags:
      - Key: "Name"
        Value: "TestPriSubnet1c"

  TestLambdaSecurityGroup:
    Type: AWS::EC2::SecurityGroup
    Properties:
        GroupDescription: Nothing
        VpcId:
          Ref: TestVPC
        Tags:
        - Key: "Name"
          Value: "TestLambdaSecurityGroup"

  TestRDSSecurityGroup:
    Type: AWS::EC2::SecurityGroup
    Properties:
        GroupDescription: Allow mysql to client host
        VpcId:
          Ref: TestVPC
        Tags:
        - Key: "Name"
          Value: "TestRDSSecurityGroup"

  TestRDSSecurityIngress:
   Type: 'AWS::EC2::SecurityGroupIngress'
   Properties:
      GroupId: !Ref TestRDSSecurityGroup
      IpProtocol: tcp
      FromPort: 3306
      ToPort: 3306
      SourceSecurityGroupId: !GetAtt TestRDSProxySecurityGroup.GroupId


  TestRDSProxySecurityGroup:
    Type: AWS::EC2::SecurityGroup
    Properties:
        GroupDescription: Allow mysql to client host
        VpcId:
          Ref: TestVPC
        Tags:
        - Key: "Name"
          Value: "TestRDSProxySecurityGroup"

  TestRDSProxySecurityIngress:
   Type: 'AWS::EC2::SecurityGroupIngress'
   Properties:
      GroupId: !Ref TestRDSProxySecurityGroup
      IpProtocol: tcp
      FromPort: 3306
      ToPort: 3306
      SourceSecurityGroupId: !GetAtt TestLambdaSecurityGroup.GroupId


  TestDBInstance:
    Type: 'AWS::RDS::DBInstance'
    Properties:
      AllocatedStorage: 20
      DBInstanceClass: db.t2.micro
      DBInstanceIdentifier: -rds-test
      DBName: !Ref DBName
      DBSubnetGroupName: !Ref TestDBSubnetGroup
      Engine: mysql
      EngineVersion: 5.7.22
      MasterUsername: !Sub '{{resolve:secretsmanager:${RDSTestInstanceRotationSecret}:SecretString:username}}'
      MasterUserPassword: !Sub '{{resolve:secretsmanager:${RDSTestInstanceRotationSecret}:SecretString:password}}'
      PubliclyAccessible: false
      VPCSecurityGroups:
        - !GetAtt TestRDSSecurityGroup.GroupId

  TestDBSubnetGroup:
    Type: 'AWS::RDS::DBSubnetGroup'
    Properties:
      DBSubnetGroupDescription: TestDBSubnetGroup
      DBSubnetGroupName: TestDBSubnetGroup
      SubnetIds:
        - !Ref TestPriSubnet1a
        - !Ref TestPriSubnet1c

  RDSProxyTest:
    Type: 'AWS::RDS::DBProxy'
    Properties:
      Auth:
        - AuthScheme: SECRETS
          IAMAuth: DISABLED
          SecretArn: !Ref RDSTestInstanceRotationSecret
      EngineFamily: MYSQL
      DBProxyName: -proxy-test
      IdleClientTimeout: 120
      RequireTLS: false
      RoleArn: !GetAtt SecretsManagerRole.Arn
      VpcSecurityGroupIds:
        - !Ref TestRDSProxySecurityGroup
      VpcSubnetIds:
        - !Ref TestPriSubnet1a
        - !Ref TestPriSubnet1c

  RDSProxyTargetGroupTest:
    Type: 'AWS::RDS::DBProxyTargetGroup'
    Properties:
      DBProxyName: !Ref RDSProxyTest
      DBInstanceIdentifiers:
        - !Ref TestDBInstance
      ConnectionPoolConfigurationInfo:
          ConnectionBorrowTimeout: 120
          MaxConnectionsPercent: 100
          MaxIdleConnectionsPercent: 100
      TargetGroupName: default


  RDSTestInstanceRotationSecret:
    Type: 'AWS::SecretsManager::Secret'
    Properties:
      Description: 'This is my rds instance secret'
      GenerateSecretString:
        SecretStringTemplate: '{"username": "master"}'
        GenerateStringKey: "password"
        PasswordLength: 16
        ExcludeCharacters: '"@/\'

  SecretRDSInstanceAttachment:
    Type: 'AWS::SecretsManager::SecretTargetAttachment'
    Properties:
      SecretId: !Ref RDSTestInstanceRotationSecret
      TargetId: !Ref TestDBInstance
      TargetType: 'AWS::RDS::DBInstance'


  SecretsManagerManagedPolicy:
    Type: 'AWS::IAM::ManagedPolicy'
    Properties:
      Description: "Get values from Secrets Manager"
      Path: /
      PolicyDocument:
        Version: "2012-10-17"
        Statement:
          - Effect: Allow
            Action:
              - "secretsmanager:GetResourcePolicy"
              - "secretsmanager:GetSecretValue"
              - "secretsmanager:DescribeSecret"
              - "secretsmanager:ListSecretVersionIds"
            Resource: !Ref RDSTestInstanceRotationSecret

          - Effect: Allow
            Action:
              - "kms:Decrypt"
            Resource: !Sub "*"
            Condition:
              StringEquals:
                kms:ViaService: !Sub "secretsmanager.${AWS::Region}.amazonaws.com"

  SecretsManagerRole:
    Type: 'AWS::IAM::Role'
    Properties:
      AssumeRolePolicyDocument:
        Version: "2012-10-17"
        Statement:
          - Effect: Allow
            Principal:
              Service:
                - "rds.amazonaws.com"
            Action:
              - "sts:AssumeRole"
      Description: "Use for RDS Proxy"
      ManagedPolicyArns:
        - !Ref SecretsManagerManagedPolicy
      Path: /
何も問題なければこのテンプレートで一から作成されるはずです。
10〜15分くらいデプロイに時間かかると思います。
【AWS】bitbank Stop注文実装
1. 使用するサービス
(AWS)
- Lambda
- IAM
- SSM
- DynamoDB
(外部サービス)
- Bitbank API
2.概要
bitbank APIにはデフォルトで逆指値注文など特殊な注文方法がありあません。今回はDynamoDBを使用して事前に設定した価格を超えるまたは下がった場合にMarket注文を行う仕組みを実装します。
3. 実装
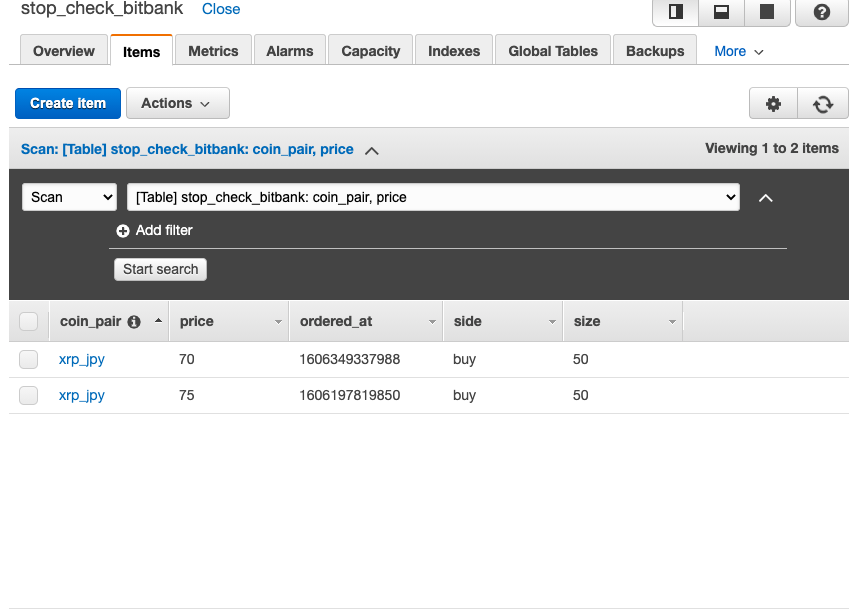
3-1. DynamoDBの中身
テーブルを事前に作成しておきます。PrimaryKeyをcoin_pair、SortKeyをPriceにします。bitflyer 自動注文などで作成したテーブルと基本内容は同じです。
buffalokusojima.hatenablog.com
3-2. Lambdaの実装
const AWS = require('aws-sdk');
const ssm = new (require('aws-sdk/clients/ssm'))();
const request = require('request');

const momentTimezone = require('moment-timezone');

const lambda = new AWS.Lambda();

AWS.config.update({region: 'ap-northeast-1'});

const ddb = new AWS.DynamoDB({apiVersion: '2012-08-10'});

exports.handler = (event, context, callback) => {

    var XRP_JPY = process.env['XRP_JPY'];
    var dbData;
    getDatafromDynamoDB('stop_check_bitbank', callback)
    .then(function(data){

        if(data.Items.length == 0){
          console.log("stop check data not set");
          callback(null, {
              statusCode: 200,
              body: JSON.stringify({message: "price check data not set"}),
              headers: {"Content-type": "application/json"}
            });
          return;
        }

        dbData = data.Items;

        console.log(dbData);

        const method = "GET"

        const path = "/xrp_jpy/depth"


        var option = {
          url: 'https://public.bitbank.cc' + path,
          method: method,
          headers: {
            'Content-Type': 'application/json'
            }
        }

    sendRequest(option,callback)
    .then(function(data){

        if(data.response.statusCode != 200){
          console.error("Error:",data.response);
          callback(null, {
            statusCode: data.response.statusCode,
            body: JSON.stringify({message: data.response}),
            headers: {"Content-type": "application/json"}
          });
          return;
        }


        var price_data = JSON.parse(data.body);

        if(price_data == null){
          console.log("price data not Found");
          callback(null, {
            statusCode: 403,
            body: JSON.stringify({message: 'No Data Found'}),
            headers: {"Content-type": "application/json"}
          });
          return;
        }

        price_data = price_data.data;
        console.log(price_data);

        dbData.forEach(function(item){

          if(item.side.S == "buy"){
            if(item.price.N < Number(price_data.asks[0][0])){
              executeOrder(item,callback);
            }
          }else if(item.side.S == "sell"){
            if(item.price.N > Number(price_data.bids[0][0])){
              executeOrder(item,callback);
            }
          }
        });

        callback(null, {
            statusCode: 200,
            body: JSON.stringify({message: 'No Order Executed'}),
            headers: {"Content-type": "application/json"}
        });
        return;
    });

    });
    function executeOrder(item,callback){
      var param = {
          "coin_pair": item.coin_pair.S,
          "price": item.price.N,
          "size": item.size.N,
          "side": item.side.S,
          "type": "market"
      };

      console.log("order will be executed:", param);

      var payload = param;

      payload = JSON.stringify({body:JSON.stringify(payload)});
      callLambda(payload, callback);
      deleteDataFromDynamoDB('stop_check_bitbank', param, callback);
    }

    function getDatafromDynamoDB(table_name, callback){

      return new Promise(function (resolve) {
          var params = {
        ExpressionAttributeValues: {
          ':c': {S: 'xrp_jpy'}
        },
        KeyConditionExpression: 'coin_pair = :c',
        ProjectionExpression: 'coin_pair, price, side, size',
        TableName: table_name
      };

      // Call DynamoDB to add the item to the table
      ddb.query(params, function(err, data) {
          if (err) {
            console.log("Error", err);
            callback(null, {
                statusCode: 401,
                body: JSON.stringify({message: err.toString()}),
                headers: {"Content-type": "application/json"}
              });
            resolve(null);
            return;
          }
          resolve(data);
        });
      });
    }

    function deleteDataFromDynamoDB(table_name, params, callback){
        var params = {
        TableName: table_name,
        Key: {
                'coin_pair' : {S: params.coin_pair},
                'price' : {N: params.price}
             }
      };
      ddb.deleteItem(params, function(err, data){
        if (err) {
          console.log("Error", err);
          callback(null, {
            statusCode: 400,
            body: JSON.stringify({message: err}),
            headers: {
              "Content-type": "application/json"
            }
          });
          return;
        }
        console.log("Success");

        params = params.Key;

        callback(null,{
          statusCode: 200,
          body: JSON.stringify({message: 'DeleteItem Success: {coin_pair: ' + params.coin_pair.S
                              + ' price: ' + params.price.N
           }),
          headers: {
            "Content-type": "application/json"
          }
        });
        return;
      });
    }

    function getParameterFromSystemManager(apikey_name, callback) {

        return new Promise(function (resolve) {
            var apikey = process.env[apikey_name];

            if(!apikey || typeof apikey == undefined){

                // Fetches a parameter called REPO_NAME from SSM parameter store.
                // Requires a policy for SSM:GetParameter on the parameter being read.
                var params = {
                    Name: apikey_name,
                    /* required */
                    WithDecryption:true
                };

                ssm.getParameter(params, function(err, apikey) {
                    if (err){
                        console.error(err.stack);
                        callback(null,{
                            statusCode: 500,
                            body: JSON.stringify({message: err.toString()}),
                            headers: {"Content-type": "application/json"}
                        });
                        resolve(null);
                        return;
                    }
                    process.env[apikey_name] = apikey.Parameter.Value;
                    resolve(apikey.Parameter.Value);
                });
            }else resolve(apikey);
        });
    }

    function callLambda(payload, callback){
        return new Promise(function (resolve) {

            var params = {
                FunctionName: "bitbank-project-pipeline-stac-ControlOrderFunction-114U1VFTL0EE0",
                InvocationType: "RequestResponse",
                Payload: payload
            }
            console.log(params);
            lambda.invoke(params, function(error, res){
                if(error){
                        console.error(error);
                        callback(null,{
                            statusCode: 500,
                            body: JSON.stringify({message: error.toString()}),
                            headers: {"Content-type": "application/json"}
                        });
                        resolve(null);
                    }
                resolve(res);
            });
        });
    }

    function sendRequest(option, callback){

        return new Promise(function (resolve) {
            request(option, function(error, response, body){

                    if(error){
                        console.error(error);
                        callback(null,{
                            statusCode: 500,
                            body: JSON.stringify({message: error.toString()}),
                            headers: {"Content-type": "application/json"}
                        });
                        resolve(null);
                    }
                    var data = {response, body}
                    resolve(data);
            });
            });
    }
};
CloudWatchで定期的にキックすることでSTOP注文を実現します。